If you want to get into the R/C
hobby, sooner or later, your going to have to learn how to solder. For
beginner's, this can be intimidating. The idea of working with 600-800°F hot
soldering iron tips and poisonous molten metal that can seriously injure you
isn't something most people are eager to learn about. I hope that last
sentence sunk in, because soldering is not something that should be done
without the proper tools and safety equipment. Soldering irons get very hot.
They instantly burn skin and can cause permanent scars. Solder, which is
primarily lead, has been shown to cause kidney failure, cancer, and all
sorts of other horrible things. So, if this article teaches you anything,
let it be the safety precautions you should take when you solder. To make
soldering easier, let's make some rules:
Rule #1 - BE CAREFUL!
Irons are hot, and solder is poisonous. Keep the iron in a coil stand or a
leaning stand that is meant to hold the iron. This will keep you from
burning yourself. Wash your hands when your done after you handle solder.
This will prevent lead poisoning. Do not solder in an area where there isn't
good air flow. The fumes that come from soldering should be avoided. It's a
good idea to have a small fan to blow them away from you to keep you from
breathing them. It's also a good idea to wear eye protection. It's not
uncommon to have small bits of solder or rosin "flicked" off the end of the
tip. Getting a molten glob of solder in your eye isn't pleasant.
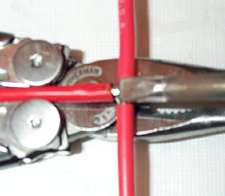
Rule #2 - Use the right tip for the
job. This is critical. Even if you have a very nice soldering iron, it's not
going to work if you have the wrong tip at the end of it. If you look at the
two tips below, you can see they are very different. Both of them are
temperature controlled, so they will both be the same temperature. So what
makes them different? Surface area! The more surface area the tip has, the
quicker heat is transferred to the metal you are trying to solder together.
If you use the wrong tip, you will transfer the heat from the tip to your
work too slowly, and it will either take forever, or ruin your work. When
you solder battery bars on cells, the heat needs to be transferred quickly
to prevent cell damage. The top tip is used for delicate soldering jobs,
such as repairing circuit boards. The bottom tip is for larger jobs, like
soldering battery bars or 12 gauge wires. The tip you will need for about
90% of your R/C needs is the tip on the bottom. It's commonly known as a
"Chisel Tip".
Rule #3 - Always tin your tip
before you use it for the first time. Most tips come pre-tinned, but some
aren't. "Tinning" is simply getting the new tip nice and hot, then melting a
lot of solder on it. This will prepare the tip for use and make soldering
easier for you. It will also protect it and make it last longer.
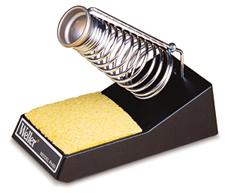
Rule #4 - Clean your tip
BEFORE and AFTER you use it. Nothing will ruin a tip quicker than
not cleaning it. The best way to do this is to use a wet sponge. Simply rub
the tip of the iron in a damp sponge and the shiny tinned tip will transfer
heat better. There are special sponges you can buy to clean your tips, but
you can use a regular one and it will work just fine. Most coil stands (like
the one pictured above) have a space meant to hold a cleaning sponge.
Rule #5 - Human beings are not
octopuses. We only have two arms, so if you need help holding something,
either get someone to help, or use something to hold what you are working on
for you. You will find that as your soldering skills get better, you won't
need to rely on other people to help hold your work.
Rule #6 - Heat the work,
NOT the solder. When you solder two pieces of metal together, your
goal is to use the least amount of solder as possible. Clean solder joints
are strong joints. If you heat the just the solder, the joint will not be
strong, the resistance will be high, and you will end up with a gloppy
metallic mess.
Rule #7 - Insulate your work if
necessary. If there is even the slightest chance of two exposed solder
joints touching each other, use either heat shrink tubing or electrical tape
to prevent shorts.
Rule #8 - ALWAYS
use a battery jig when you solder cells together. It's virtually impossible
to solder battery bars and keep the cells in place at the same time. I
recommend the W.S.
Deans Speed Jig. It will hold the battery bar in place for you so you
can hold the solder in one arm and the iron in the other. And we know from
Rule #5, we are not octopuses.
OK, now that we have the ground
rules set, let's talk about equipment. There are basically two types of
irons you can buy. You can get a soldering iron or a soldering gun.
Personally, I think soldering guns are useless, especially in the
applications it would be used for in the R/C Hobby. Irons are lightweight
and are easier to use. I use a Weller W60P iron. It's a little more
expensive, but I think in the long run, it's worth the money. The W60P is
temperature controlled and has a wide variety of tips available. It comes
with a small point tip, so you will need to get a chisel tip for it. You
want Weller Part # CT5E8. It sells for about $6. The W60P costs about $63.
The best place I have found on the internet to get this soldering iron is
through a store called
WASSCO. They also carry the CT series tips for the W60P. The CT series
tips come pre-tinned. You can find them
HERE. There are cheaper
soldering irons out there, but they won't last as long, and the tips need to
be replaced frequently. Cheaper tips are made of solid copper with a zinc
coating. After about 10 uses, the zinc coating wears off, and the tip
becomes useless. I have been using the same CT tip for about a year now, and
it still works great. Just remember - You get what you pay for.
There are all kinds of solder
available - 60/40, Silver, Rosin Core... I like to use 60/40 rosin core
solder from Radio Shack. Rosin core solder is usually a 60/40 mix - 60% Tin,
40% Lead. A one pound spool of 60/40 rosin core solder will cost your about
$12 at Radio Shack. You can also get smaller spools of silver solder for
about $4 from
W.S. Deans. I prefer the rosin core, because it's cheaper and the rosin
helps the solder flow between the two pieces of metal you are trying to join
together.
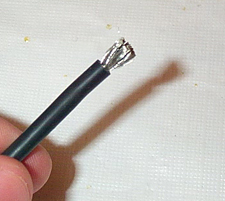
OK, here are a few of the types
of joints you are going to have to make if you are involved with electric
R/C cars. The first thing we need to learn is how to tin wires. 99% of the
wires we use the the R/C hobby are what are known as "stranded" wires. These
are wires that are made up of tiny strands that are twisted together. This
makes them highly flexible. If you take a piece of 12 gauge wire and strip
off the insulation, you'll get something that looks like this:
Notice how the wires are
all twisted together. Tinning the wire will make it easier to solder it
to whatever we want to attach it to. Take the exposed end of the wire
and pinch it between the thumb and pointer finger. Use your other hand
and twist the insulated part of the wire to bring all the strands into a
nice tight twist.
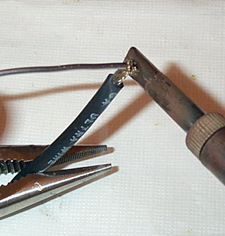
You can use a pair of
pliers to hold the wire while you tin it. Notice how my iron is on one
side of the wire and the solder is on the other side. This is an example
of Rule #6. 12 Gauge stranded wire can sometimes be a little hard to
tin. To make the heat flow from the tip better, you may want to melt a
TINY bit of solder on it. When the wire heats up, the
solder will melt. The rosin core will help the solder get "wicked" into
the wire strands. When the strands are all covered with solder, remove
the iron and the solder.
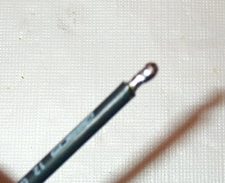
This is what you will end
up with. The wire strands should be wound tight and covered with solder.
That's all there is to tinning a wire. Pretty simple, huh? This is
pretty easy to learn how to do with some practice. Once you can tin
wires correctly, the rest comes pretty easily.
The first joint we need to
learn how to make is a T-Joint. This joint can be seen in Electronic
Speed Controls that have only three outputs - Black (Goes to Negative
Battery), Blue (Goes to Negative Motor), and Red (Goes to Positive Motor
and Positive Battery). To create this type of joint, you need to remove
about 3/16th inch section of insulation from the Red wire coming from
your motor. The end of this wire will be connected to the positive
battery terminal. Tin the section of the wire that you removed as shown
in the picture. (NOTE - the pictures are for reference only, your wires
will be different lengths due to the layout of your chassis. Make the
wires as long as they need to be so they can reach what they need to be
connected to, but try to keep them as short as possible to eliminate
resistance and clutter. It's a good idea to measure how much wire you
will need and mark where your T-Joint will be before you solder the wire
to the motor.)
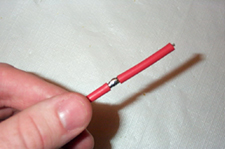
Tin another wire on both
ends to connect the exposed section to the red terminal of the ESC and
the motor wire. Again, make this wire as long as it needs to be to make
the connection, but try to keep it as short as possible. You shouldn't
need any more solder to connect the two wires, but if you need it, just
add a little. It's OK to leave this type of joint exposed, since it's
pretty unlikely to short out under normal conditions.
Now that you have learned
the T-Joint, I will show you how to eliminate it completely if you want
to. Sometimes it's easier to solder the exposed section of the wire
directly to the red post of the ESC, like the Associated TC3. This is
sometimes a little harder to do, since the wires get a little cramped in
a small space. Use which ever method is easier for you.
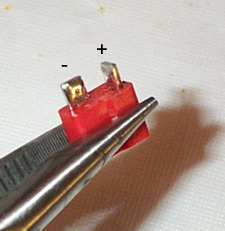
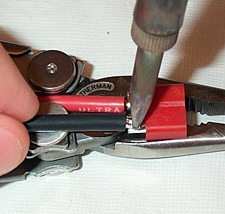
Now I'm going to show you
how to solder wires to a high performance connector. This is a W.S.
Deans 2 Pin Ultra Plug Connector. I have tinned the connectors already,
but we need to add the wire leads. Just a warning. Connectors (any kind)
get VERY HOT when you solder them. NEVER hold the connector with your
fingers when you solder the wires to the tabs. You will get burnt. Let
the connector cool for a few minutes between soldering the tabs to keep
it from melting. Now we need to strip about 1/8th inch of insulation off
the wires and tin them.
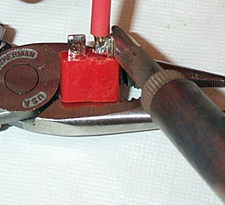
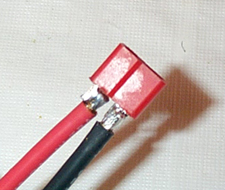
Before you solder anything,
remember to slide on any heat shrink tubing if you are going to need it.
Nothing is more frustrating than having to unsolder a joint because you
forgot the heat shrink tubing to insulate the joint. Use your pliers to
hold the connector while you solder. When you pre-tin the connector and
the wire, put just a tiny extra amount of solder on the wire and the
connector tab. Since we know from Rule #5 that we only have two hands,
we can elimiate hoding the solder by letting the extra solder we tinned
on the wire and the tab make the connection for us. Notice again, I am
heating the work, not the solder. When the tab gets hot enough, the
solder will melt, then the solder on the wire will melt, and the joint
will form. You will need to keep the wire in place for 5-10 seconds
while the solder cools and the joint hardens.
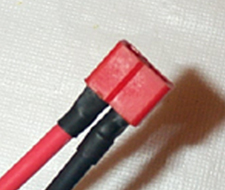
Now do the same with the
negative wire. Be careful not to make a "solder bridge" between the
negative and postive wires. This would cause a short - and possibly a
trip to the hobby shop for a new ESC and battery.
Here's the completed
joints. Notice they are a nice shiny color, and they are solidly
connected to the tabs. You should be able to pull pretty hard on the
wires without breaking the joint. If the joint breaks, you probably have
what is refered to as a "rosin joint". This is a joint that looks ok,
but the only reason it is connected is because the rosin is acting like
a "glue". This type of a joint has a very high resistance and will
eventually fail, maybe even cause a short. You should ALWAYS
insulate this type of joint to prevent a short.
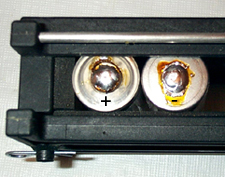
Slide the heat shrink
tubing over the joints and shrink it. Now you have a professional
looking solder job! Just another bit of advice. If you decide to use
connectors instead of hardwiring (soldering the wires directly to the
battery pack), NEVER use male connectors on batteries. The
terminals on a male connector are usually more exposed, and are more
likely to short out.
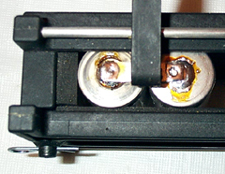
The last thing you are
defiantely going to need to learn how to solder are battery bars. The
first thing your should do is get the cell surface prepared. Rough-up
the surface of the negative and positive ends of each cell with a Dremel
tool or some sandpaper. This will make it easier for the cells to bond
to the solder. After you have prepared them, tin the ends of the cells.
If you end up with a lot of rosin on the cells, don't worry, you can
clean it away with a wire brush later.
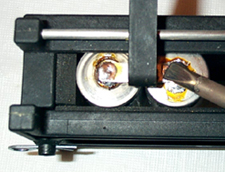
You can pre-tin the bar if
you wish. It will make it easier to solder the bar onto the cell. The
W.S. Deans Speed Jig's clip wil hold the bar in place for you.
Press down on the ends of
the battery bar with the soldering iron. The chisel tip will cause the
solder to melt and make a nice joint without heating up the cell too
much. Do the same with the other end of the battery bar.
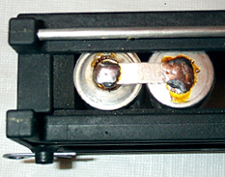
Remove the clip, and the
joint is finished. You can use a wire brush to clean away the extra
rosin. If you want to prevent the bars from shorting out, you can cover
the whole pack in shrink wrap if you want, however, if you do this, you
won't be able to
equalize your cells.
Well, those are the most common
joints you will have to make in the R/C car hobby. It takes a while to learn
how to solder well. Practice makes perfect! I hope this helps you become a
better solderer, and don't forget when your done cleaning up - WASH YOUR
HANDS. This will get the lead off your fingers. Have fun soldering


 Rule #1 - BE CAREFUL!
Irons are hot, and solder is poisonous. Keep the iron in a coil stand or a
leaning stand that is meant to hold the iron. This will keep you from
burning yourself. Wash your hands when your done after you handle solder.
This will prevent lead poisoning. Do not solder in an area where there isn't
good air flow. The fumes that come from soldering should be avoided. It's a
good idea to have a small fan to blow them away from you to keep you from
breathing them. It's also a good idea to wear eye protection. It's not
uncommon to have small bits of solder or rosin "flicked" off the end of the
tip. Getting a molten glob of solder in your eye isn't pleasant.
Rule #1 - BE CAREFUL!
Irons are hot, and solder is poisonous. Keep the iron in a coil stand or a
leaning stand that is meant to hold the iron. This will keep you from
burning yourself. Wash your hands when your done after you handle solder.
This will prevent lead poisoning. Do not solder in an area where there isn't
good air flow. The fumes that come from soldering should be avoided. It's a
good idea to have a small fan to blow them away from you to keep you from
breathing them. It's also a good idea to wear eye protection. It's not
uncommon to have small bits of solder or rosin "flicked" off the end of the
tip. Getting a molten glob of solder in your eye isn't pleasant.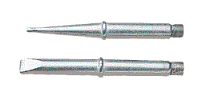 Rule #2 - Use the right tip for the
job. This is critical. Even if you have a very nice soldering iron, it's not
going to work if you have the wrong tip at the end of it. If you look at the
two tips below, you can see they are very different. Both of them are
temperature controlled, so they will both be the same temperature. So what
makes them different? Surface area! The more surface area the tip has, the
quicker heat is transferred to the metal you are trying to solder together.
If you use the wrong tip, you will transfer the heat from the tip to your
work too slowly, and it will either take forever, or ruin your work. When
you solder battery bars on cells, the heat needs to be transferred quickly
to prevent cell damage. The top tip is used for delicate soldering jobs,
such as repairing circuit boards. The bottom tip is for larger jobs, like
soldering battery bars or 12 gauge wires. The tip you will need for about
90% of your R/C needs is the tip on the bottom. It's commonly known as a
"Chisel Tip".
Rule #2 - Use the right tip for the
job. This is critical. Even if you have a very nice soldering iron, it's not
going to work if you have the wrong tip at the end of it. If you look at the
two tips below, you can see they are very different. Both of them are
temperature controlled, so they will both be the same temperature. So what
makes them different? Surface area! The more surface area the tip has, the
quicker heat is transferred to the metal you are trying to solder together.
If you use the wrong tip, you will transfer the heat from the tip to your
work too slowly, and it will either take forever, or ruin your work. When
you solder battery bars on cells, the heat needs to be transferred quickly
to prevent cell damage. The top tip is used for delicate soldering jobs,
such as repairing circuit boards. The bottom tip is for larger jobs, like
soldering battery bars or 12 gauge wires. The tip you will need for about
90% of your R/C needs is the tip on the bottom. It's commonly known as a
"Chisel Tip".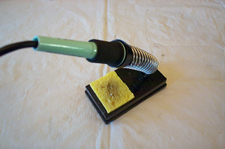 OK, now that we have the ground
rules set, let's talk about equipment. There are basically two types of
irons you can buy. You can get a soldering iron or a soldering gun.
Personally, I think soldering guns are useless, especially in the
applications it would be used for in the R/C Hobby. Irons are lightweight
and are easier to use. I use a Weller W60P iron. It's a little more
expensive, but I think in the long run, it's worth the money. The W60P is
temperature controlled and has a wide variety of tips available. It comes
with a small point tip, so you will need to get a chisel tip for it. You
want Weller Part # CT5E8. It sells for about $6. The W60P costs about $63.
The best place I have found on the internet to get this soldering iron is
through a store called
OK, now that we have the ground
rules set, let's talk about equipment. There are basically two types of
irons you can buy. You can get a soldering iron or a soldering gun.
Personally, I think soldering guns are useless, especially in the
applications it would be used for in the R/C Hobby. Irons are lightweight
and are easier to use. I use a Weller W60P iron. It's a little more
expensive, but I think in the long run, it's worth the money. The W60P is
temperature controlled and has a wide variety of tips available. It comes
with a small point tip, so you will need to get a chisel tip for it. You
want Weller Part # CT5E8. It sells for about $6. The W60P costs about $63.
The best place I have found on the internet to get this soldering iron is
through a store called 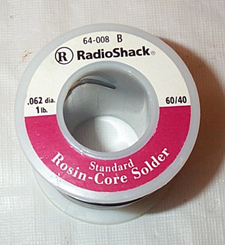 There are all kinds of solder
available - 60/40, Silver, Rosin Core... I like to use 60/40 rosin core
solder from Radio Shack. Rosin core solder is usually a 60/40 mix - 60% Tin,
40% Lead. A one pound spool of 60/40 rosin core solder will cost your about
$12 at Radio Shack. You can also get smaller spools of silver solder for
about $4 from
There are all kinds of solder
available - 60/40, Silver, Rosin Core... I like to use 60/40 rosin core
solder from Radio Shack. Rosin core solder is usually a 60/40 mix - 60% Tin,
40% Lead. A one pound spool of 60/40 rosin core solder will cost your about
$12 at Radio Shack. You can also get smaller spools of silver solder for
about $4 from